
The thought of advancing from painting your miniature models with a regular brush to using an airbrush can raise a couple of questions that need to be answered before you can execute the idea.
I know.
My mind was overwhelmed right away. First, there was the process of painting, then the tools, maintenance, features, accessories, and paint.
Woah… go easy on me.
But as always, it turned out to be less scary than I initially thought.
With a little bit of help from local hobby painters and tattoo artists, I have gathered all of the information I have stumbled upon during my years as an apprentice airbrusher. Hopefully, I’ll be able to get you going and save you a bit of money.
For a beginner, I would recommend a dual-action, gravity-feed airbrush with a smaller needle, somewhere in the 0.25-0.5mm range, and a narrow nozzle with a diameter of 0.3mm in combination with a workplace that offers constant air flow, preferably a spray-booth and a good compressor that doesn’t make too much noise. Continue reading to find out what models I recommend and what I’ve based my recommendations on.
Getting started with airbrushing
I’m guessing you don’t own an airbrush just yet, so you’re hoping to find some kind of information on which one to get. Yeah, we’ll get there. Click a link to jump to the selected section of the article.
- 1. How To Pick An Airbrush
- 2. Best Airbrushes For Beginners
- 3. Airbrush Accessories/Maintenance & Extras
- 4. How To Paint Figures With An Airbrush
It can be frustrating to look at a product page and not understand a single of the terms describing the product. With terms like single/dual action, external/internal mix, gravity or siphon feed, and a myriad of other alternatives it will be hard to justify what makes one airbrush better than the other.
It depends entirely on what you’re planning to do with the airbrush, one needle size might work wonders for miniature models while another size can do a better job at something else. The same thing applies to all of the functions and properties of the airbrush.
Because this article is focused on painting miniature models, I’ll focus on the airbrushes and accessories that ARE good for miniature models. If you’re looking for good airbrush settings for something else then I can’t promise that my recommendations will deliver.
The recommendations I’ll be making are made on my own experience, the information I have gathered, other people’s experience, input from people with expertise in this area, and consensus. I consider myself well-read on the topic with more than 5 years as an avid user of airbrushes.
Enough about me.
In this article, we’ll cover everything a beginner needs to know to start airbrushing miniature models, including the purchase of an airbrush.
Read more: Why You Should Airbrush Miniature Models
Getting the right airbrush
This picture shows the prime parts of an airbrush. The functionality of an airbrush depends on the cooperation of these parts. However, with so many different parts and functions comes insecurities.
Well, ask yourself this: What am I going to use the airbrush for?
Yes, painting minis, I know.
But will you be painting extremely detailed figures or coating larger figures/terrain? Let’s tear them pieces down one-by-one to get a little clarity.
Feeds
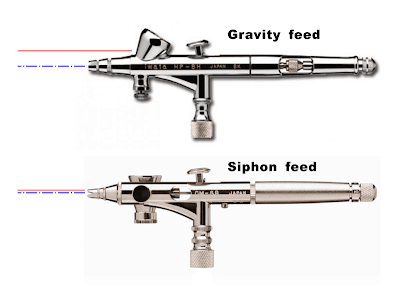
What kind of feed the airbrush has will determine how the paint is fed into the airbrush. There are gravity-fed and siphon-fed airbrushes. Both have their advantages so let’s compare them.
If you want to read more about painting in Warhammer, read our article on it!
Read more: 18 Tips & Tricks To Get Better At Painting Warhammer Minis
GRAVITY FEED AIRBRUSH: The paint is transported from the paint cup on top of the airbrush down to the inner parts of the airbrush by the force of gravity alone.
Using a gravity feed can be very useful when painting detailed parts of your minis, the natural flow of the paint requires less air pressure making it easier to paint with precision without overdoing it. I’ve been using a lot of gravity feeds over the years and I’ve come to love them for all kinds of miniature painting.
Gravity feeds call for more frequent paint refills because of the smaller paint cups, this in combination with the added precision makes them very suitable for small models but they work for both and are generally used for models of all sizes.
SIPHON FEED AIRBRUSH: Instead of storing the paint on top of the airbrush, siphon feeds have their paint cup attached to the underside of the airbrush. The paint is then fed to the paint container with a tube, in the container the paint waits for air pressure to pass through the tube which then siphons it into the mixing chamber.
Because of the added pressure needed to force the paint into the mixing chamber, the siphon-fed airbrushes work better for large models and base coating. In addition to the increased pressure, the siphon-feed brushes usually have storage for more paint making them more suitable for larger models.
Because of the finesse offered by the gravity siphon, I find it well-suitable for the miniatures I plan on painting. The smaller cup is no problem for me as I do a lot of detail work and need to put the airbrush down once in a while no matter what to avoid getting tired which causes my hands to shake a little.
My recommendation is to go with a gravity feed for your miniatures.
Single versus dual-action
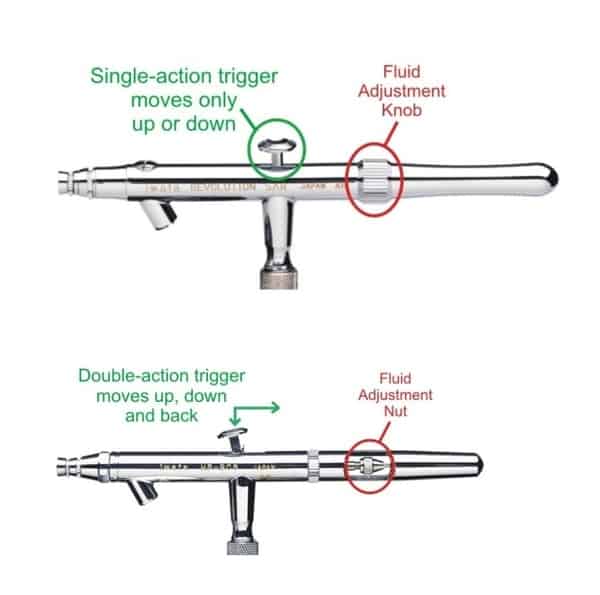
If an airbrush is single or dual-action will determine if the brush can adjust both the amount of air and paint flow when you paint. The ability to change and adapt both as you go makes the dual action very attractive for painting miniatures but requires a little bit of skill.
You see, the flow of air and paint will have an impact on your ability to control the airbrush when painting.
SINGLE-ACTION AIRBRUSH: Single-actions, as the name describes, can only adjust the flow of air. To adjust the paint flow the user must stop painting, open up the airbrush and change the depth of the needle. Pair that with a small cup and you’ve got an obstacle at every 5-minute mark.
Operating the dual-action might be slightly harder because of the manual adjustments that can be made. However, I think most painters will move from single-action to dual-action sooner or later because of its versatility.
DUAL-ACTION AIRBRUSH: In comparison to its counterpart, the dual-action airbrush allows the user to adjust both air and paint flow mid-session without trouble. The trigger can be pressed down/up but also forward/back, pressing it up or down controls the amount of air that flows through while sliding the lever/button forward or backward determines the flow of paint.
This allows for real-time changes when the painter requires. Changing the air/paint flow back and forth can be done effortlessly, therefore, the dual-action airbrush is the way to go for someone who paints complex miniatures.
I’m not saying single-actions are bad, they are awesome. I just like how adaptable the dual actions are when painting complex figures that require fine-tuning.
Internal or External Mix?
The term internal and external mix explains where the paint and air mix or atomize. The internal models mix inside the tip of the airbrush while external airbrushes mix outside of the airbrush’s tip.
Well, how does it affect the actual results?
INTERNAL MIX: Internal mix airbrushes generate a very soft spray, somewhat reminiscent of a photography dot pattern. Internally mixed airbrushes produce a smooth, fine finish to the objective. When painting miniature models that’s something we prefer.
EXTERNAL MIX: In an externally mixed airbrush the paint and air are atomized outside the tip, resulting in a rude spray, ideal for spraying large areas but not the best pick for miniature models. Of course, you can mix with the paint and still get a somewhat smooth finish to the external mix but it’s not the easiest way to go about it.
I recommend using an airbrush with an internal mix for miniature models.
Airbrush needle and nozzle size for miniatures
The needle is the point that projects the air/paint mix onto the object. The bigger the diameter of the needle the bigger the spread of the spray, when painting miniature models you want to spray fine lines and those require smaller needles.
For miniature models, I would recommend getting a needle with a diameter anywhere between .2-.5 depending on the size of the miniatures you plan on painting – for bigger ones I would lean towards .5, and for smaller ones .25mm.
- 0.15mm and smaller: Very delicate detail work
- 0.2mm-0.25mm: Fine spray patterns and coating of small bases.
- 0.3mm-0.35mm: Well-suited for fine detailing and freehand work. My recommendation for miniature models.
- 0.4mm-0.5mm: For larger models and base coating of such models. Not the best option for very detailed models.
Aiming for a 0.3 needle will cover most of your needs when airbrushing miniature models. Smaller needles require more precision and skill to use, as a beginner you should let yourself evolve as a painter before you pick the smaller needles.
Every brush model doesn’t accept needles of all sizes – choosing a more versatile airbrush will allow the user to try different needles until they find the size that fits their work and ability. Most airbrush needles cannot withstand bending, causing them to either break, bend or clog up entirely – handle the needle with care to keep it operable for as long as possible.
The airbrush nozzle, also known as the tip, has an effect on the breadth of the spray, choosing a smaller, more narrow nozzle will result in a smaller, more narrow spray line and is therefore recommended to use for detail work and fine lines.
Picking a wider nozzle will instead result in a wider spray.
The nozzle and needle work together to produce the result you want. Airbrush nozzles come in numerous size variations but the majority of airbrushes come with needles and nozzles when bought – buying a set will however give you the option of changing between a couple of nozzles and needles.
Nozzle diameter
- Fine 0.2mm
- Medium 0.35mm
- Heavy 0.5mm
If you want to paint finer lines I would go with a 0.25-0.4mm needle and a 0.3mm nozzle. Thicker paint demands thicker nozzles. If your paint hasn’t been pre-thinned it will need to be thinned.
Try to be as cautious as possible to avoid clogging. Clogging won’t render your airbrush useless – there are methods of unclogging it but we’ll cover that later…
Grip
Two grips can be used on the airbrush, either you go with a pistol grip or a normal grip.
- The pistol grip is, just as you’d imagine, shaped like a pistol and, unlike the regular grip, you start the airflow by pulling the trigger slightly and then pulling more to adjust the flow of paint.
- The regular grip has a trigger on top of it, to start the airflow you push it downwards and then pull it back to determine the amount of paint you want flowing through.
I can’t tell you that either of these is better, it comes down to personal taste. I’ve used both and I prefer the regular grip because I’m very familiar with it but I can’t say anything bad about the pistol grip.
Needle stops
Needle stops allow the user to restrict the trigger from being pulled too far, making it possible for the user to keep a constant flow throughout without worrying about pulling too hard on the trigger.
Best airbrush brands for miniatures
These are my recommendations and luckily enough for my legitimacy, they seem to be quite popular with miniature painters.
Badger, Paasche, Harder & Steenbeck, and Iwata have been the go-to brands for my miniature airbrushes and the ones I have recommended to my friends. These brands offer models for beginners at very reasonable prices – they also have a collection of quite expensive models for the painter who wants the best of the best.
Read more: Selecting the Best Iwata Airbrush in 2022
You should find everything you could ask for among the brands I’ve mentioned. They have, over the years, delivered some over-the-top airbrush models for professionals and hobbyists. I have for periods of time used all of these brands and I’m very pleased with what they have to offer.
Best airbrush for Warhammer
Now that we know what we’re searching for in an airbrush we can take a closer look at some of my favorites for airbrushing Warhammer figures and miniature models. As a total beginner, it would be smart to stay away from the 300$ models – you will see great results from much cheaper models. I’ve included two Itawa models that I recommend – both very affordable.
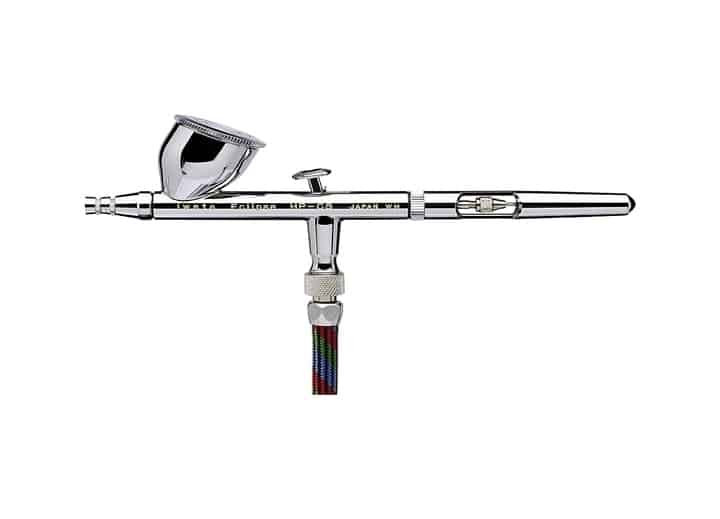
1. Iwata Eclipse HP-CS.
- High-quality brush
- Perfect for fine and medium spray patterns such as miniatures
- Easy to clean and remove clogs
- Feels great to operate and work with
- Economical with paint
- Great for beginners
The Iwata Eclipse is a very popular airbrush used by artists and model painters all over the world. Within the series, the HP-CS model is probably one of the most popular models for both beginners and professionals.
The Iwata Eclipse is a high-class internal mix airbrush that puts the quality of other manufacturers to the test – and with the 5-year-warranty it seems like the company knows it. For the hobby painter, I would see no reason to upgrade or exchange the Eclipse for something else after 5 years.
The airbrush features a gravity feed and dual-action, just as we want it. In addition to that, the Eclipse comes with a drop-in self-centering nozzle and a 0.35mm needle to house the paint fed from the rather big cup on top of the airbrush, measuring 1/3 oz – the design offers a new funnel shape that makes paint flow more effectively and cleaning the airbrush becomes a breeze.
If the hairline-thin spray pattern offered by the 0.35mm needle, which is just awesome for painting detail, isn’t big enough for you – don’t worry, the Iwata Eclipse includes a bigger 0.5mm nozzle that’s perfect for beginners. This makes the Iwata a versatile worker that excels at fine detail work, varnish, highlighting/shading, and base coating.
Another thing to note is the weight of the airbrush In use the airbrush felt steady and well-balanced because of the extra weight added to the instrument, I found the extra weight to help stabilize my quite shaky hands when painting.
Overall, it’s just an awesome airbrush for fine-line and medium spray patterns for both beginners and pros. The Eclipse will last a lifetime if handled correctly – cleaning and maintenance become a walk in the park thanks to the cut-away handle which makes it easy to dismantle the brush.
Conclusion: Nothing I’ve tried can match the all-aroundness of the Itawa Eclipse. For a pretty reasonable price, you get an airbrush that will cater to all your needs for years to come. This is my all-time favorite.
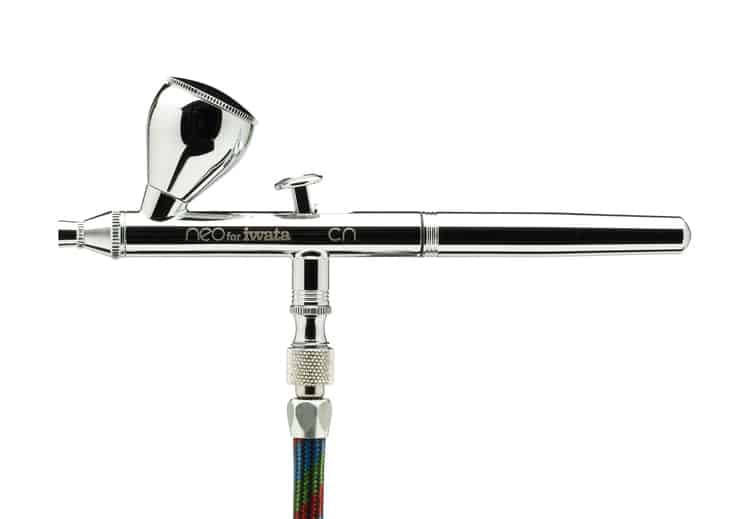
2. NEO for Iwata CN
- A better choice for someone on a budget – very affordable.
- Does well with smaller compressors that produce a maximum of 20 psi
- Includes two cups – large 1/3 oz and medium 1/16 oz.
- Easy to clean
- Smooth and efficient paint flow
The saying “you get what you pay for” doesn’t apply to this airbrush – it exceeds the bang per buck ratio of most airbrushes in the industry – and just like they did with its relative, the Eclipse, the manufacturers offer a 5-year-warranty for Neo.
It’s another gravity-feed airbrush by the groundbreaking team at Itawa. With its 0.35mm needle and nozzle combination the Neo provides the user with excellent fine-to-medium spray patterns and lines.
To further improve your painting, the Neo can deliver perfect lines with minimal amounts of air pressure, somewhere between 5 and 35 psi will do wonders, as a result of the Neo’s low demand for air pressure it produces great quality detail with smaller compressors (maximum of 20 psi).
Armed with the dual-action feature that we’re looking for, the airbrush allows the user to keep a steady flow of air while varying the amount of paint flow. It feels like a quality product in hand and the trigger is really smooth. For such a reasonable price the Neo is perfect for beginners who want to try their luck at airbrushing without spending their life savings.
Conclusion: While I do favor the Eclipse, the Neo can still achieve greatness for such a small price. Possibly the best choice for a total beginner who doesn’t want to get ruined. The Neo delivers perfect, smooth spray lines.
Airbrush accessories
Now that we’ve got the actual airbrush, what else do we need to make sure it works and stays operable for as long as possible?
The first thing we need is a compressor.
What kind of compressor should you use for airbrushing Warhammer/miniature figures? Well, that depends. Unlike compressors used for bigger tools, these compressors aren’t nearly as loud or clumsy. However, there are options that we need to evaluate – two different alternatives.
Do we want a compressor with a tank or one without a tank?
The tank inside the compressor will fill up with air for the airbrush to use when the trigger is pulled and refill when needed – to always have air on supply makes for a very smooth, constant flow of pressure. Instead, with the tankless compressor, you will have to battle a pulse of air coming through the hose regularly. For that reason, I have always favored the compressors that come equipped with a tank.
Let’s evaluate the ups and downs
Tank
- Smooth constant flow
- Better for longer sessions
- Downside: Costs a little bit more
Tank-less
- Cheaper
- Smaller in size
- Good for shorter sessions
- Downside: The pulse that is sent through once in a while can disrupt the smoothness of the flow.
I recommend going with a tanked compressor for beginners but It doesn’t make all the difference in the world. There are a lot of low-quality compressors from China on the market – therefore, I recommend paying a little extra to get some of the better compressors manufactured by trusted brands.
To pair with the Iwata airbrushes I’ve chosen a high-quality Iwata compressor: Iwata-Medea Studio Series Ninja Jet
-
- Low maintenance, oil-less single-piston air compressor
-
- Working pressure from 0 psi to 18 psi.
-
- Includes 3m coiled vinyl hose
-
- Pressure Adjustment knob
-
- Comes with an attached airbrush holder
-
- Noise: 55 – 57 decibels
- Use per session: Cycles of 30 minutes of continuous use. Let compressor rest for 20 minutes after finished cycle before using it again.
Here’s an alternative if your budget doesn’t allow the purchase of an Iwata compressor.
Cleaning & Maintenance
For the sake of keeping your airbrush functioning as long as possible, this step might be the most important of them all. If you don’t take good care of your airbrush, sooner or later it will take damage or, even worse, stop working.
This includes regularly cleaning it after use, using the right paint, and overall carefulness. The paint inside the airbrush will clog after some time, make sure to remove and clean the airbrush regularly to avoid clogging, also make sure to check your paint to make sure it isn’t clogged.
To protect your airbrush from harm, I would recommend getting these items:
With these, it’ll be easy to keep the airbrush as good as new. Here’s a video tutorial on how to clean your airbrush.
Alternatively, you could use an ultrasonic cleaner for your airbrush.
What paint to use with an airbrush
The brands you’ve used when painting your figures with a brush will most likely offer products that are well-suited for airbrush painting. Vallejo and Badger have specific parts of their product line made for the airbrush, Vallejo Model Air, Vallejo Game Air, and Minitaire.
The difference between these and the regular acrylic paint lines is that these come pre-thinned, ready to mix in the airbrush and spray. The benefit of using airbrush paint is that it doesn’t clog nearly as much as regular color and won’t require as much cleaning.
However, it is possible to use your regular paint as long as it has been thinned accordingly. If it hasn’t, thin it yourself with water or airbrush thinner – I use water but using a thinner is beneficial because it keeps the tip of the airbrush from drying.
I’ve heard of painters who mix water and vodka and use it as thinner but I can’t recommend that as I’ve never tried it. Me myself, I use Vallejo Game Air paint it has worked wonderfully.
Best airbrush paint for miniatures
- Badger Minitature Set
- Vallejo Game Air Paint Set – This is what I’m using.
To prime miniature figures
I wouldn’t avoid prime when painting figures, it makes quite a difference. Prime helps the paint stick to the model, kind of like a nice basecoat – covering the grey plastic, leaving a solid base to start painting on.
To prime with an airbrush is simple. You’ll need a primer, preferably something by Vallejo or Badger, and a room with ventilation. Yeah, you can apply the primer in-house. I’ve had much success with the Vallejo primer over the years – a quick spray leaves my figures covered in a very smooth, thin coat.
I’ll say it again: Don’t forget to apply a layer of primer when painting your figures. If you have metal figures – spray the figure several times to avoid paint chipping.
How to paint miniature models with an airbrush
First make sure that your paint is mixed to the right consistency – to do this – drag a little paint from the bottom of the airbrush cup up to the edges and see if the paint runs down without leaving a trace, then you’re good. The paint is thin enough to paint with.
If the paint is thick it will stick to the cup or move down very slowly and leave a trace of paint – add water or airbrush thinner.
Read more: How To Airbrush Miniatures Indoors
The next thing is adjusting the airbrush pressure. When painting miniatures we want a PSI of 12-18 for pre-thinned paint. Thicker paint will most likely require more pressure.
After applying the primer, let it dry, and then start painting the figure with your color of choice.
I distance myself about 4 inches from the target when I paint – 4 inches isn’t always the right distance though, an indicator that I go by is the way the paint behaves when landing on the model – if it splatters and spreads, then I’m too close and if it atomizes before landing on the miniature I’m too far.
Thank you so much for reading this guide. I hope it has been helpful!
Here’s a video that goes through some basic airbrushing techniques for beginners.